
Introduction: Android Testing in 2026
Manual testing doesn't scale. Testing an Android app across 12 versions, 50 device models, and hundreds of user flows manually is impractical. In 2026, the complexity of the Android ecosystem has only increased, making automated mobile quality assurance a necessity rather than an option.
Appium remains the industry standard for Android testing. It allows you to write tests once and run them across multiple Android versions, device sizes, and configurations. This 2026 updated tutorial covers the complete Appium setup, writing your first automated test with WebDriverIO, and fixing the 17 most common problems you'll encounter in modern mobile automation.
Whether you're testing on the latest Android 15 or supporting legacy devices, this guide will provide the foundation for robust, scalable mobile app testing.
What is Appium and Why Use It for Android Testing?
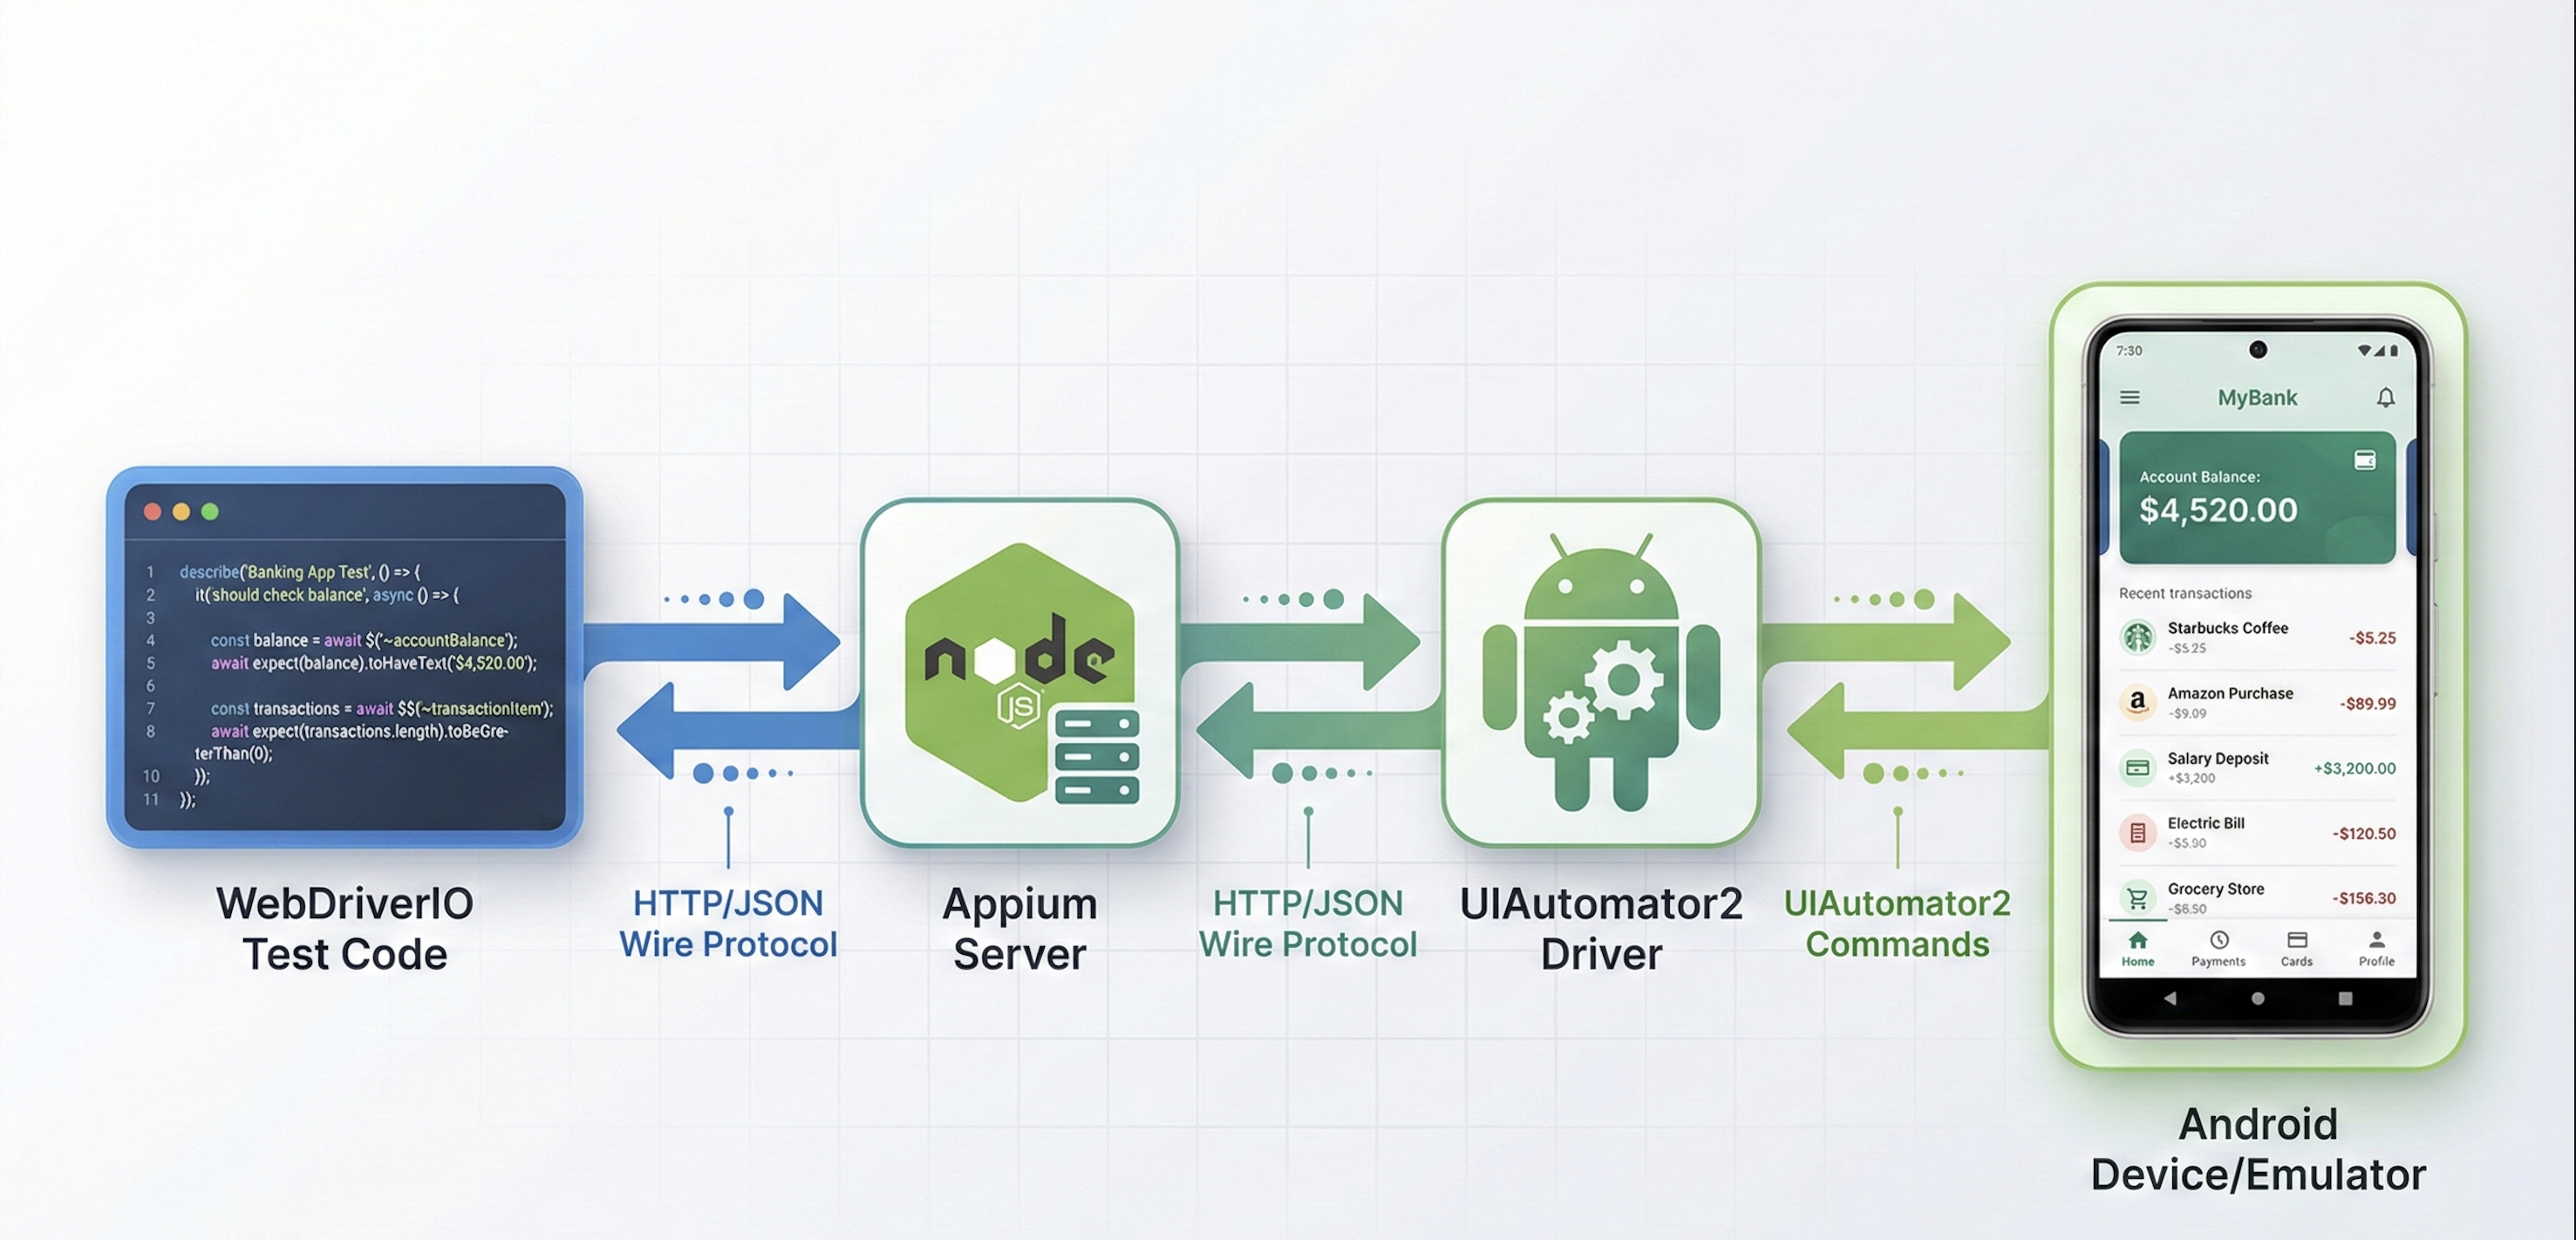
Appium is an open-source test automation framework for mobile applications. It works with native Android apps, iOS apps, hybrid apps, and mobile web browsers using the WebDriver protocol—the same standard that powers Selenium and Playwright for web testing.
For Android UI testing specifically, Appium leverages the UIAutomator2 driver—Google's official Android automation framework. This means your Android test scripts interact with apps the same way users do, providing reliable mobile app quality assurance.
Appium doesn't require modifying your app's source code. You test the same APK that ships to production. It supports multiple programming languages (JavaScript, Python, Java, Ruby, C#) and runs tests on real devices and emulators.
When your test says "tap the login button," Appium translates that into UIAutomator2 commands that Android understands. The app responds as if a real user tapped the screen.
Appium's cross-platform capability matters when testing both Android and iOS. Write your test logic once, configure different drivers for each platform, and reuse most of your code. For a deeper comparison of testing frameworks, see our guide on Test Automation Frameworks: Playwright, Selenium, Cypress, and Appium Compared.
If Appium's configuration complexity and flaky selectors are slowing your Android testing, Autonoma eliminates both — AI agents test your app on real devices autonomously, adapting when your UI changes without any script maintenance.
Appium Android Testing: Prerequisites and System Requirements
Before installing Appium, you need four core dependencies: Java JDK, Node.js, Android SDK, and the Appium server. In 2026, we recommend the following versions for maximum compatibility.
System Requirements:
- macOS 12.0+, Windows 11+, or Linux (Ubuntu 22.04+)
- 16GB RAM minimum (32GB recommended for running multiple emulators)
- 50GB free disk space
Verify what you have installed:
# Check Java version (need JDK 21 or higher)
java -version

# Check Node.js version (need 18+ recommended)
node --version

# Check npm version
npm --version

# Check if adb is installed
adb version
If any command fails, install that dependency in the following sections.
Step 1: Environment Setup
Installing Java JDK for Appium Android Setup
macOS:
# Install via Homebrew
brew install openjdk@21

# Add to PATH
echo 'export PATH="/usr/local/opt/openjdk@21/bin:$PATH"' >> ~/.zshrc
source ~/.zshrc
Windows:
- Download JDK 21 installer from Oracle's website
- Run installer and note installation path (e.g.,
C:\Program Files\Java\jdk-21) - Add to system PATH:
- Open System Properties → Environment Variables
- Add new system variable:
JAVA_HOME=C:\Program Files\Java\jdk-21 - Edit PATH variable, add:
%JAVA_HOME%\bin
Linux (Ubuntu):
sudo apt update
sudo apt install openjdk-21-jdk

# Verify installation
java -version
Node.js and npm Installation for Appium Mobile Automation
macOS:
# Install via Homebrew
brew install node

# Verify
node --version
npm --version
Windows:
Download the Node.js installer from nodejs.org and run it. The installer includes npm automatically.
Linux:
# Using NodeSource repository
curl -fsSL https://deb.nodesource.com/setup_20.x | sudo -E bash -
sudo apt-get install -y nodejs

# Verify
node --version
npm --version
Installing Android SDK and Android Studio
Android Studio includes the Android SDK and tools for creating virtual devices.
- Download Android Studio from developer.android.com/studio
- Run the installer and follow the setup wizard
- During setup, ensure "Android SDK" and "Android Virtual Device" are checked
After installation, open Android Studio:
Configure SDK:
- Go to Settings/Preferences → Appearance & Behavior → System Settings → Android SDK
- Under SDK Platforms, install at least one Android version (Android 14/API 34 or Android 15/API 35 recommended)
- Under SDK Tools, ensure these are installed:
- Android SDK Build-Tools
- Android SDK Platform-Tools
- Android Emulator
- Intel x86 Emulator Accelerator (HAXM) on Intel Macs/Windows or Android Emulator Hypervisor Driver on AMD
Set environment variables:
macOS/Linux - Add to ~/.zshrc or ~/.bashrc:
export ANDROID_HOME=$HOME/Library/Android/sdk  # macOS
# export ANDROID_HOME=$HOME/Android/Sdk  # Linux

export PATH=$PATH:$ANDROID_HOME/emulator
export PATH=$PATH:$ANDROID_HOME/platform-tools
export PATH=$PATH:$ANDROID_HOME/tools
export PATH=$PATH:$ANDROID_HOME/tools/bin
Then reload your shell:
source ~/.zshrc # or source ~/.bashrcWindows - Add system environment variables:
- Open System Properties → Environment Variables
- Add new system variable:
- Name:
ANDROID_HOME - Value:
C:\Users\YourUsername\AppData\Local\Android\Sdk
- Name:
- Edit PATH, add these entries:
-
%ANDROID_HOME%\platform-tools -
%ANDROID_HOME%\emulator -
%ANDROID_HOME%\tools -
%ANDROID_HOME%\tools\bin
-
Verify the installation:
adb version
# Should output: Android Debug Bridge version X.X.X

echo $ANDROID_HOME  # macOS/Linux
echo %ANDROID_HOME%  # Windows
# Should output your SDK path
Android Emulator Setup: Creating AVD for Appium Testing
You need an Android emulator to run your tests.
In Android Studio:
- Open AVD Manager (Tools → Device Manager)
- Click "Create Device"
- Select a device definition (Pixel 8 recommended for testing)
- Select a system image (download Android 14/API 34 if not already available)
- Name it "AppiumTest" for easy reference
- Click Finish
Start the emulator from command line:
# List available AVDs
emulator -list-avds

# Start your AVD
emulator -avd AppiumTest
Wait for the emulator to fully boot (you'll see the Android home screen). Verify adb can see it:
adb devices
# Should output:
# List of devices attached
# emulator-5554    device
The device name (like emulator-5554) is what Appium will use to connect.
Installing Appium Server
Install Appium globally via npm:
npm install -g appium

# Verify installation
appium --version
# Should output something like: 2.5.1
Appium 2.x requires installing drivers separately. Install the UIAutomator2 driver for Android:
appium driver install uiautomator2

# Verify driver installation
appium driver list
# Should show uiautomator2@X.X.X installed
Start the Appium server to verify everything works:
appiumYou should see output like:
[Appium] Welcome to Appium v2.5.1
[Appium] Appium REST http interface listener started on http://0.0.0.0:4723
[Appium] Available drivers:
[Appium]   - uiautomator2@2.34.1 (automationName 'UiAutomator2')
Leave this terminal window running. Appium server needs to be active when you run tests.
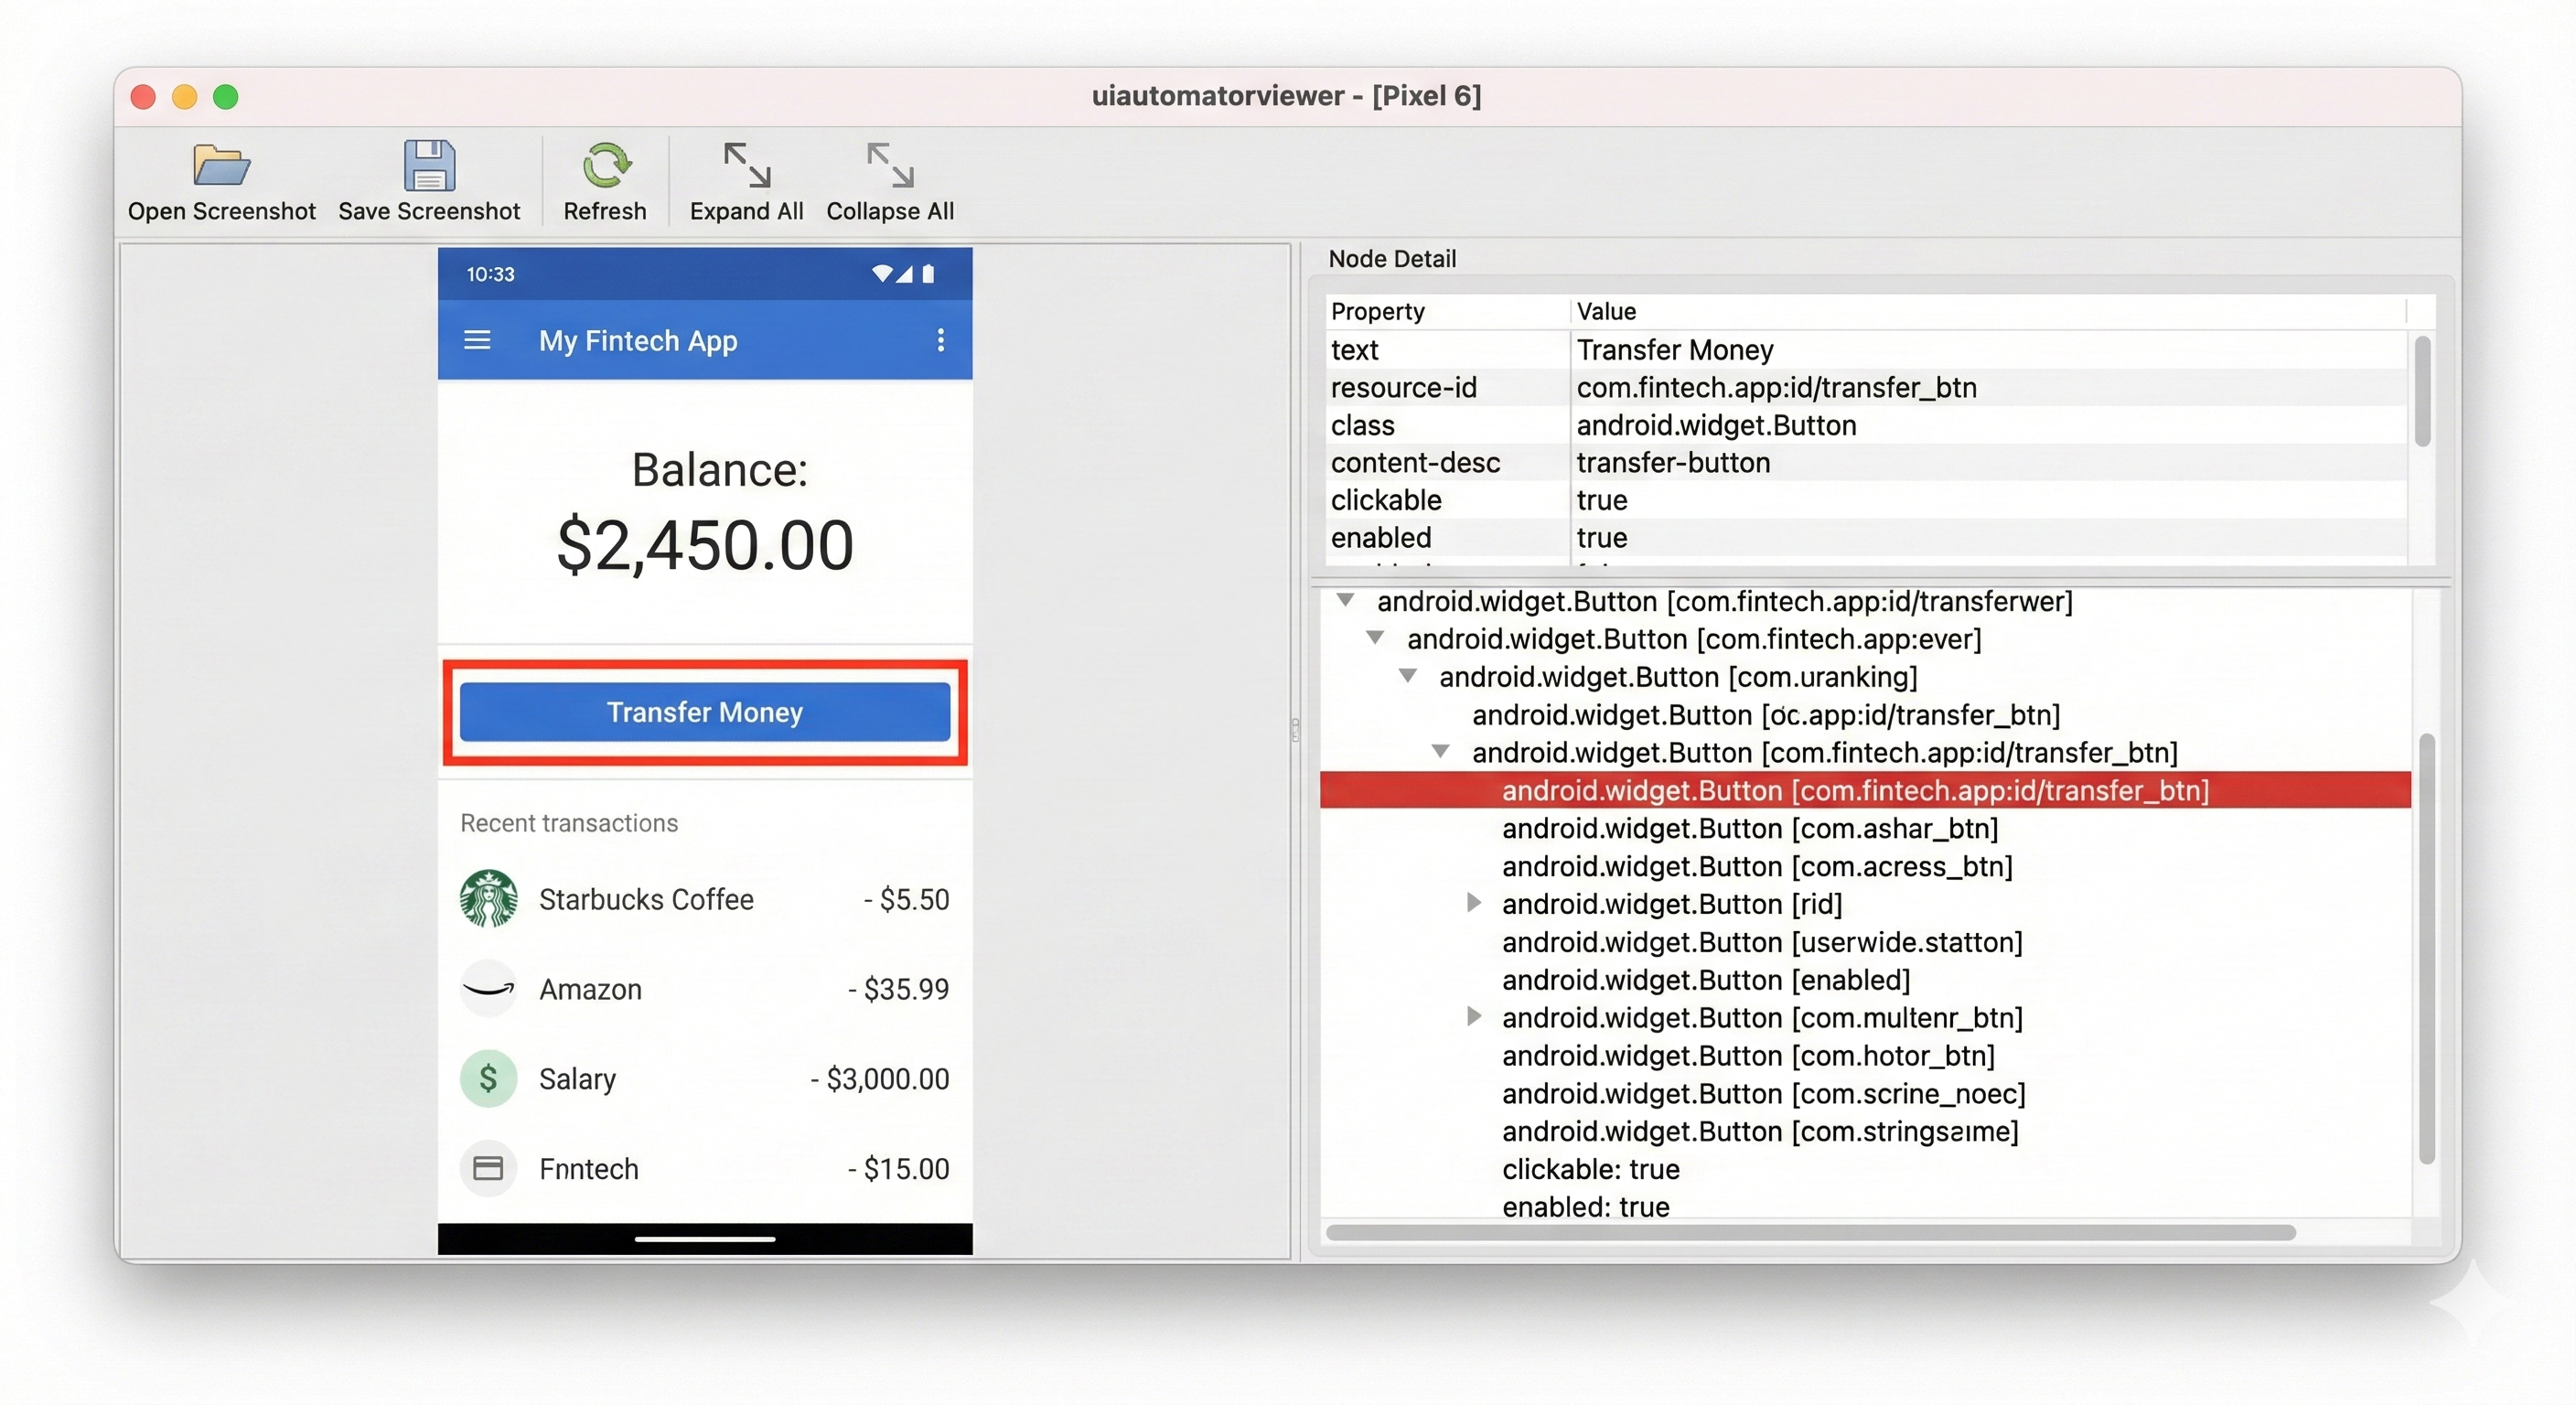
Appium Inspector: Now with AI-based Suggestions
Appium Inspector is a desktop application that allows you to inspect your app's UI elements. In 2026, it now features AI-based element locator suggestions, helping you find the most stable selectors for your automation.
- Download Appium Inspector from GitHub Releases
- Open the app and connect to your local Appium server
- Enter your desired capabilities (platformName, deviceName, app path, etc.)
- Click "Start Session" to see your app's UI tree and interact with elements
Step 2: Your First Android Test
Setting Up Your Test Project with WebDriverIO
Create a new directory for your tests:
mkdir appium-android-test
cd appium-android-test
npm init -y
Install WebDriverIO and Appium dependencies:
npm install --save-dev @wdio/cli
npm install --save-dev @wdio/local-runner
npm install --save-dev @wdio/mocha-framework
npm install --save-dev @wdio/spec-reporter
npm install --save-dev @wdio/appium-service
Initialize WebDriverIO configuration:
npx wdio configWhen prompted:
- Test environment: Mobile - native/hybrid apps
- Backend: On my local machine
- Framework: Mocha
- Specs location: ./test/specs//*.js** (default)
- Reporter: spec
- Services: appium (select this)
- Base URL: Leave empty (not needed for mobile)
This creates wdio.conf.js in your project root.
Configuring WebDriverIO for Android
Edit wdio.conf.js and configure the capabilities for Android 14/15+:
exports.config = {
    runner: 'local',
    port: 4723,

    specs: [
        './test/specs/**/*.js'
    ],

    capabilities: [{
        platformName: 'Android',
        'appium:automationName': 'UiAutomator2',
        'appium:deviceName': 'AppiumTest', // Your AVD name
        'appium:platformVersion': '14.0', // Your Android version
        'appium:app': '/path/to/your/app.apk', // Path to your APK
        'appium:appWaitActivity': 'com.yourapp.MainActivity',
        'appium:noReset': false, // Uninstall app after session
        'appium:newCommandTimeout': 240
    }],

    logLevel: 'info',
    bail: 0,
    waitforTimeout: 10000,
    connectionRetryTimeout: 120000,
    connectionRetryCount: 3,

    services: ['appium'],

    framework: 'mocha',
    reporters: ['spec'],

    mochaOpts: {
        ui: 'bdd',
        timeout: 60000
    }
}
Writing Your First Appium Android Test
Let's test a simple fintech app login flow. Create test/specs/login.spec.js:
describe('Fintech App Login Test', () => {

    it('should successfully log in with valid credentials', async () => {
        // Wait for app to load
        await driver.pause(3000);

        // Find and fill email field
        const emailField = await $('~email-input'); // Using accessibility ID
        await emailField.setValue('user@example.com');

        // Find and fill password field
        const passwordField = await $('~password-input');
        await passwordField.setValue('SecurePass123!');

        // Tap login button
        const loginButton = await $('~login-button');
        await loginButton.click();

        // Wait for home screen to load
        await driver.pause(2000);

        // Verify we're on home screen by checking for balance element
        const balanceLabel = await $('~account-balance');
        const isDisplayed = await balanceLabel.isDisplayed();

        // Assert that we successfully logged in
        expect(isDisplayed).toBe(true);
    });
});
Run the test:
# Make sure Appium server is running in another terminal
# appium

# Run the test
npx wdio run wdio.conf.js
Step 3: Advanced Mobile Testing Strategies
Biometric Authentication Testing
Modern Android apps rely heavily on biometric authentication. In 2026, Appium provides robust support for simulating fingerprint and face unlock on emulators.
describe('Biometric Login', () => {

    it('should authenticate with fingerprint', async () => {
        // Trigger biometric prompt in app
        await $('~use-biometric-button').click();

        // Wait for biometric dialog
        await driver.pause(1000);

        // Simulate fingerprint touch on emulator
        await driver.execute('mobile: fingerprint', { action: 'authenticate' });

        // Verify logged in
        const homeScreen = await $('~home-screen');
        expect(await homeScreen.isDisplayed()).toBe(true);
    });
});
Deep Links and Background/Foreground Testing
Testing how your app handles deep links and background state is critical for mobile quality assurance.
// Open deep link during test
await driver.execute('mobile: deepLink', {
    url: 'myapp://transfer/123',
    package: 'com.yourapp.package'
});

// Test background/foreground transition
await driver.background(5); // Send app to background for 5 seconds
await driver.pause(1000); // Wait for foreground transition
Step 4: Integration with Autonoma
Scaling your Appium test suite requires more than just writing scripts; it requires intelligent maintenance and high-speed execution. This is where Autonoma's agentic engineering platform comes in.
How the Maintainer Agent Updates Locators
In a fast-paced development environment, UI changes happen constantly. A button moved to a different container or a class name changed can break dozens of Appium tests. The Maintainer agent at Autonoma monitors your test suite and automatically heals broken locators by identifying the element's new position or ID based on its visual and structural context.
[DIAGRAM: Maintenance Cycle - UI Change -> Maintainer Agent -> Updated Locators -> Passing Test]
Running Appium Tests in the Executioner Pipeline
The Executioner agent (formerly known as the Automator) handles the heavy lifting of running your Appium tests in parallel across multiple devices and environments. It orchestrates the setup of emulators, deployment of APKs, and execution of test scripts, providing fast feedback to your development team.
By integrating Appium with Autonoma, you move from manual script maintenance to a system that grows and heals alongside your application, ensuring your "vibe" stays high and your "slop" stays low.
Conclusion: The Future of Appium
Appium remains the bedrock of Android testing in 2026. While new frameworks emerge, its cross-platform support, large community, and deep integration with the Android ecosystem make it indispensable for serious mobile QA teams.
By following the steps in this guide—from modern environment setup with Java 21 to advanced biometric testing and Autonoma integration—you can build a mobile testing strategy that is robust, scalable, and future-proof.
The journey from manual testing to automated mobile quality assurance is a marathon, not a sprint. Focus on critical user paths, use stable selectors, and leverage AI agents to handle the complexity of maintenance.
Happy testing!
Appium in 2026 features improved support for Android 15, AI-based element locator suggestions in Appium Inspector, and more robust handling of biometric authentication and deep links on modern emulators.
We recommend using Java JDK 21 or higher for maximum compatibility with the latest Android SDK and Appium 2.0+ drivers.
Yes, Appium can test both Android emulators and real devices. For real devices, you'll need to enable USB debugging and potentially provide a UDID in your capabilities configuration.


