

State transition testing is a test design technique that models a system as a finite set of states connected by transitions, then builds test cases around which state-event pairs are valid and which must be refused. A complete model names four things: the states a system can occupy, the events that request a move between them, the guards and actions attached to each transition, and the transition rules that decide, for every state-event pair, what should happen. Most write-ups stop at the states and the happy path; the rules for every invalid pair are where the interesting testing lives.
Say the word "transitions" in an interview and you'll get asked to draw the diagram. Most candidates sketch two circles, logged out and logged in, one arrow between them, and the interviewer moves on because there was nothing else worth asking. That two-state toy is also where most published explanations stop. It's technically a state machine. It's also useless as proof you understand the technique, because a system with two states has no interesting invalid transitions to name. If a login flow is genuinely what you're testing, our own login page test cases post covers it directly; what follows here is for flows with enough states that the toy diagram stops being useful.
This is for the QA engineer or SDET preparing for the study guide, the interview, the onboarding doc, or the auditor asking whether a suite checks the negative space, not just the happy path. Not the QA lead weighing suite design budget across techniques, and not a team wondering whether their AI-generated tests exercise anything real. Just the vocabulary: states, events, transitions, rules, applied to something with enough states to matter. State transition testing is one of seven test design techniques in that broader toolbox; what follows covers only this one, in full.
One disclosure up front, because it shapes which half of the technique this article spends its time on. Autonoma builds agents that read a codebase's routes and guard logic to work out what a flow's state machine actually is, so the table below is the by-hand version of a job we care about automating. None of the vocabulary depends on that. The table is the same table whether you fill it in yourself or something else does.
The order state machine
Take an order moving through a store, not a login form. Six states cover a normal lifecycle: Created (order exists, nothing charged), Paid (payment captured, nothing shipped), Shipped (handed to a carrier), Delivered (carrier confirms receipt), Refunded (money returned), and Cancelled (called off, no charge stands).
Five events request a move between them: pay, ship, deliver, cancel, and refund, each a request rather than a guarantee. Whether it succeeds depends on the guard attached to it: the check that looks at the current state before allowing a transition, and either lets it through or refuses it outright. pay only succeeds from Created; deliver only succeeds from Shipped. The guard is the part every two-state diagram skips, because with two states there's nothing for a guard to check.
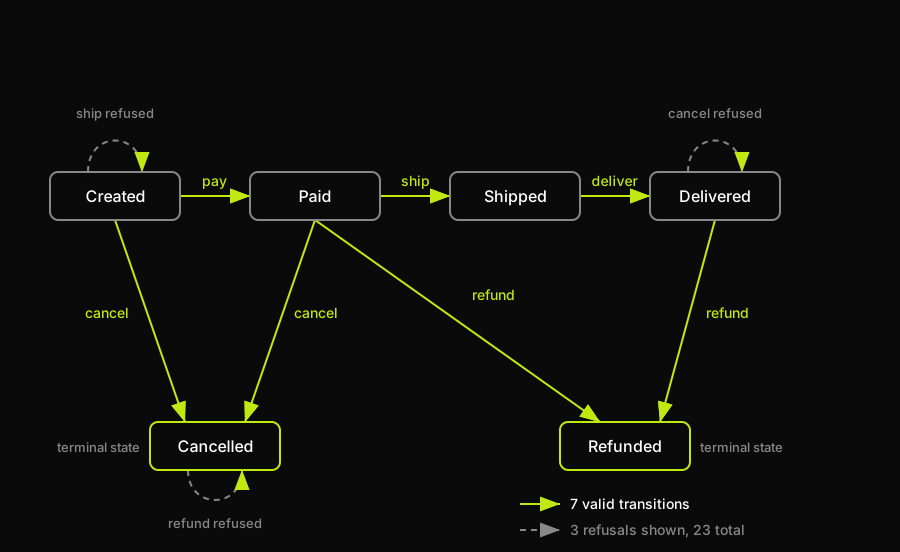
Seven arrows are valid. That's the entire happy-path graph, and it's genuinely small. Everything the graph doesn't draw is the interesting part: every state-event pair with no arrow is an invalid transition, and there are twenty-three of them here, the half most write-ups skip.
The full state transition table, including the cells everyone drops
A transition table is the artifact a state diagram gestures at and rarely delivers: every state as a row, every event as a column, every cell filled in, valid or not. It's also where state transition testing splits from decision table testing: a decision table organizes independent conditions with no history, while a state machine's outcome depends entirely on where the system already is. The same event, cancel, is valid from Created and Paid and invalid everywhere else, exactly the history-dependence a decision table has no column for.
Here is the full table for the order lifecycle above. Invalid means the guard on that event refuses it from that state; nothing about the order changes.
| State | pay | ship | deliver | cancel | refund |
|---|---|---|---|---|---|
| Created | Paid | Invalid | Invalid | Cancelled | Invalid |
| Paid | Invalid | Shipped | Invalid | Cancelled | Refunded |
| Shipped | Invalid | Invalid | Delivered | Invalid | Invalid |
| Delivered | Invalid | Invalid | Invalid | Invalid | Refunded |
| Refunded | Invalid | Invalid | Invalid | Invalid | Invalid |
| Cancelled | Invalid | Invalid | Invalid | Invalid | Invalid |
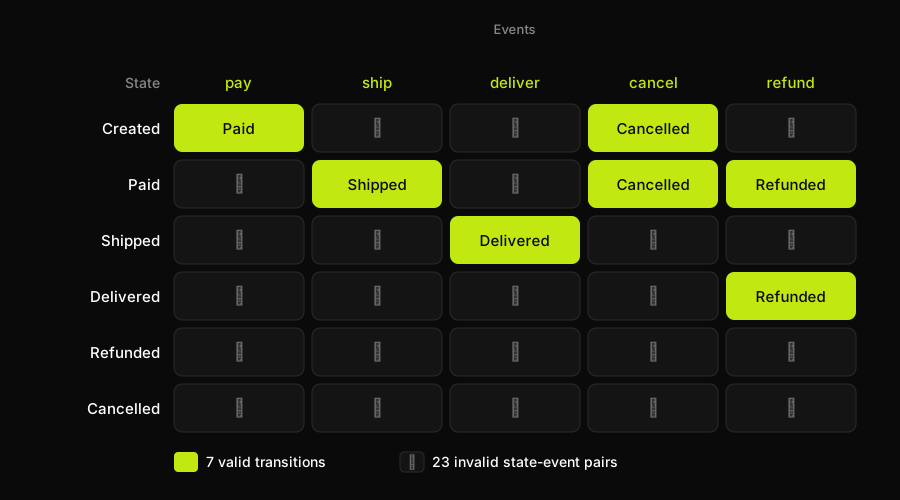
30 cells, 7 valid. Most explanations of this technique show the seven; almost none show the twenty-three, and the twenty-three are where production incidents actually live: shipping an order nobody paid for, refunding one that was already cancelled and never captured a charge, cancelling one that was already handed to the customer. Each is a single row-and-column lookup above, and each is a bug that only shows up once someone, or some agent, tries the wrong event from the wrong state.
There's a reason this table is the artifact and not the diagram, and it's the same reason we ended up building Autonoma to read source rather than to read whiteboards. The seven valid cells are the ones anyone on the team can reconstruct from memory, because they're the flow everyone demos. The twenty-three refusals only exist as guard conditions in a file, and a table built from what people remember will have seven cells in it every time.
Testing the refusals
Seven of the thirty cells get tested constantly, because they're the happy path and nothing ships without them passing. The twenty-three invalid cells get tested rarely, usually one or two of the obvious ones, on the assumption that a guard written for one invalid transition generalizes to the others. It often doesn't, because guards get added one bug report at a time, not reviewed as a set.
Reviewing them as a set is mechanical work, which is a decent argument for handing it to something that reads the whole file instead of the one guard a person happens to remember. That's the step Autonoma's agents take before planning a case: enumerate the guards actually present in the source, then drive the running application to check each refusal holds, rather than assuming the guard that got a bug report generalizes to the other twenty-two cells. The rest of this section is the same exercise done by hand, which is the version worth understanding first.
Here's the guard function this table is built from, plus the transition map it checks against:
The interesting test here isn't the one proving pay moves Created to Paid. It's the one proving refund does nothing to a Cancelled order, the exact incident the transition table flags: a cancelled order that never captured a charge gets a refund request anyway, and the system has to refuse it rather than error unhelpfully or, worse, appear to succeed. Here's that test, alongside the rest of the valid and invalid transition assertions:
"The system correctly refused this" is an assertion most suites never write down, because a refusal is the absence of a state change, easy to mistake for nothing to test. A suite that only asserts on valid transitions passes every check while a broken guard silently lets a Delivered order get cancelled, or a Shipped one refunded before it arrives. The assertion has to exist on both sides: state changed as promised, or it didn't, and the system said why not.
0-switch and 1-switch coverage
This is also where switch coverage earns its name over just "test every state." Switch coverage comes from Chow's 1978 paper, "Testing Software Design Modeled by Finite-State Machines," published in IEEE Transactions on Software Engineering, the paper that introduced 0-switch and 1-switch coverage for finite-state-machine testing. 0-switch coverage means covering each of the seven valid transitions once, which the tests above already do. 1-switch coverage means covering every valid pair of consecutive transitions, first target matching second source: pay-ship, pay-cancel, pay-refund, ship-deliver, deliver-refund, five sequences in all. Cancelled and Refunded are dead ends with nothing to chain after, and cancelling straight from Created has nothing valid before it either, so it needs its own standalone test regardless of the chains.
Every change to a guard is also a regression risk against cells that used to be invalid; re-running the table after a change is the kind of regression testing these flows rarely get by hand.
How Autonoma covers multi-step flows
State transition testing was built for a different constraint than the one most teams have today: it exists to pick a small, structurally justified set of cases when trying every combination by hand was expensive. That constraint mostly disappeared for the input-sampling techniques, because running more cases got cheap once a suite already exists. State transition testing aged differently. A transition table isn't a sampling rule for cutting down which inputs to try; it's a specification of what the system is allowed to do next, given where it already is.
That's exactly the shape of a multi-step flow: an order moving through payment, fulfillment, and delivery, a signup moving through verification steps, a subscription moving through trial, active, and churned. A specification doesn't get cheaper to author by hand just because running it got cheaper, and a flow with real states is expensive to write guard-by-guard test cases for.
That holds whether the guards were written by a person or generated by an AI coding assistant; the constraint that changed was execution cost, not who wrote the guard, and a specification the constraint never touched doesn't get easier to write just because tests got cheaper to run.
This is the layer Autonoma's agents read a codebase to find, the same way a grey box tester reads source before deciding what to test, except verifying through the running application rather than the internals directly. Given access to the routes, the components, and the guard logic behind them, an agent can work out which states an application actually implements and which events move between them, starting from the code instead of from a diagram someone already drew by hand.
That matters most for the states nobody diagrammed in the first place: a guard patched in months after a flow first shipped, added to close one specific bug report, rarely makes it back onto anyone's whiteboard, but it's still sitting in the routes an agent reading the code will find. From there, testing the flow means driving the actual application in a live preview: attempting the valid sequences and checking the state lands where it should, and attempting the invalid ones and checking that the guard refuses them the way the code says it will.
Reading the code first is what makes the invalid half tractable at all. A technique that depends on a person noticing every guard by inspection tends to end up covering the happy path and calling it done, which is the same gap our broader end-to-end testing strategy piece covers from the planning side rather than the vocabulary side.
None of this replaces a unit test on the guard function itself, the kind that runs in milliseconds directly against the transition map. It's the layer above that: whether the flow behaves correctly once it's wired into routes, a database, and a UI that a person or an agent actually drives, which a guard's unit test can't see on its own.
The same technique, applied to your own process
There's one more state machine worth naming, and it isn't in your product: it's the one your own team already operates every time a bug gets filed. New, In Progress, Fixed, Verified, Closed, Reopened, whatever your tracker calls them, is a state machine with its own valid and invalid transitions: closing a bug nobody verified, reopening one that was never closed, verifying a fix that was never marked fixed. Same table, same guard logic, same argument for testing the refusals, applied to the defect life cycle instead of an order. Both are directed graphs with a small happy path and a much larger invalid neighborhood around it, and both get the same treatment: name every state, name every event, fill in the table, and write the test that proves a refusal actually refuses. If you've followed the table above, you already know how to build that one too.
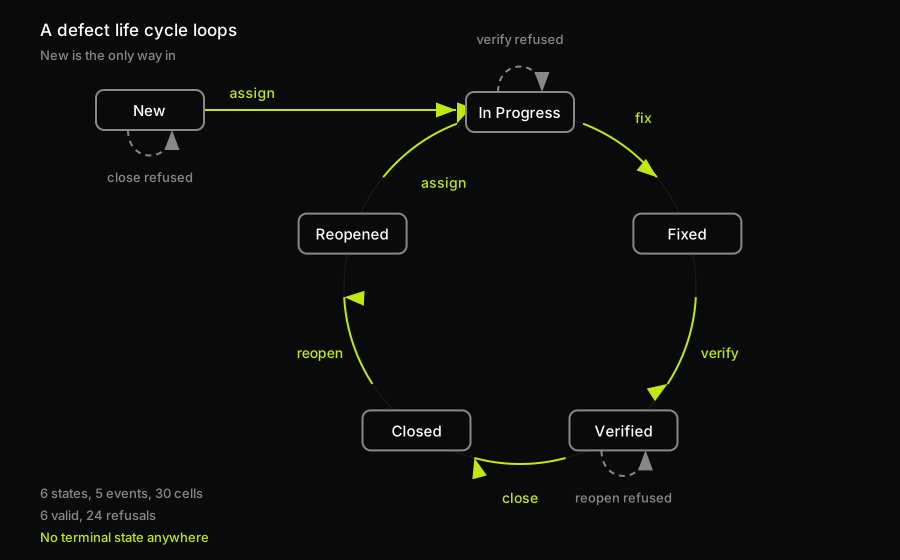
Draw it and the same arithmetic falls out: six states against five events is thirty cells, six of them valid, twenty-four refusals nobody has written a test for. The difference from the order machine is the cycle at the bottom. An order that reaches Refunded or Cancelled is finished, but a closed bug can always come back, which means the invalid neighbourhood here includes every way a bug can re-enter the flow in the wrong state.
7 valid transitions, 23 invalid ones, and one test file that says which of the 30 actually got checked. That's the version of this technique worth carrying into the interview, the onboarding doc, or the audit: not the two-state toy, the full table, counted. If your own product's order flow, or signup flow, or subscription flow, has more than a couple of states, the table is worth building before an incident builds it for you. Autonoma reads the routes and guards already in your codebase to find that table and test both halves of it against the running application, which is the part of this exercise that stops scaling by hand once a state machine grows past a handful of states.
Frequently Asked Questions
State transition testing is a test design technique that models a system as a finite set of states connected by transitions, and designs test cases around which state-event pairs are valid and which should be refused. It requires naming the states, the events that request a move between them, the guards and actions attached to each transition, and the rules that decide, for every state-event combination, what should happen. Most treatments stop at the valid transitions; a complete version also tests every invalid one. A six-state order lifecycle with five events, for example, produces a 30-cell transition table with only 7 valid cells.
A state transition diagram is a directed graph representation of a state machine: each state is a node, and each valid transition is a labeled arrow from one state to another showing which event causes the move. Diagrams conventionally only draw the valid arrows, which is why most state transition diagrams look simpler than the system they represent. The invalid transitions, every state-event pair with no arrow, are usually left to a separate transition table rather than drawn on the diagram itself.
An invalid transition is a state-event pair that should not succeed: requesting an event from a state where the system's rules do not allow it. In an order lifecycle, refunding a cancelled order that never captured a charge, or shipping an order that was never paid for, are both invalid transitions. Testing an invalid transition, sometimes called invalid transition testing, means confirming the system actively refuses the request rather than silently doing nothing or, worse, allowing it.
State transition testing is worth using whenever a system's behavior depends on its history, not just its current input: order lifecycles, signup and onboarding flows, subscription billing states, approval workflows, and defect tracking are all common examples. If two identical inputs can produce different, correct outcomes depending on what state the system is already in, that's a signal the system is a state machine and the technique applies. It's less useful for stateless calculations, where equivalence partitioning or boundary value analysis fit better.
0-switch coverage means testing every individual valid transition in a state machine at least once. 1-switch coverage means testing every valid pair of consecutive transitions, two transitions in a row where the first one's target state matches the second one's source state. 1-switch coverage is strictly more thorough than 0-switch coverage for transitions that chain, but any valid transition whose source has no valid predecessor, or whose target has no valid successor, still needs its own standalone test, since it can never appear inside a two-step chain.
Both. Our agents read a codebase to work out which states and guards a flow actually implements, then test it by driving the running application through a live preview environment: attempting the valid transitions and checking the state lands correctly, and attempting the invalid ones and checking that the guard refuses them. Autonoma doesn't replace a unit test on the guard function itself; it verifies that the refusal still holds once the flow is wired into real routes, a database, and a UI.


