
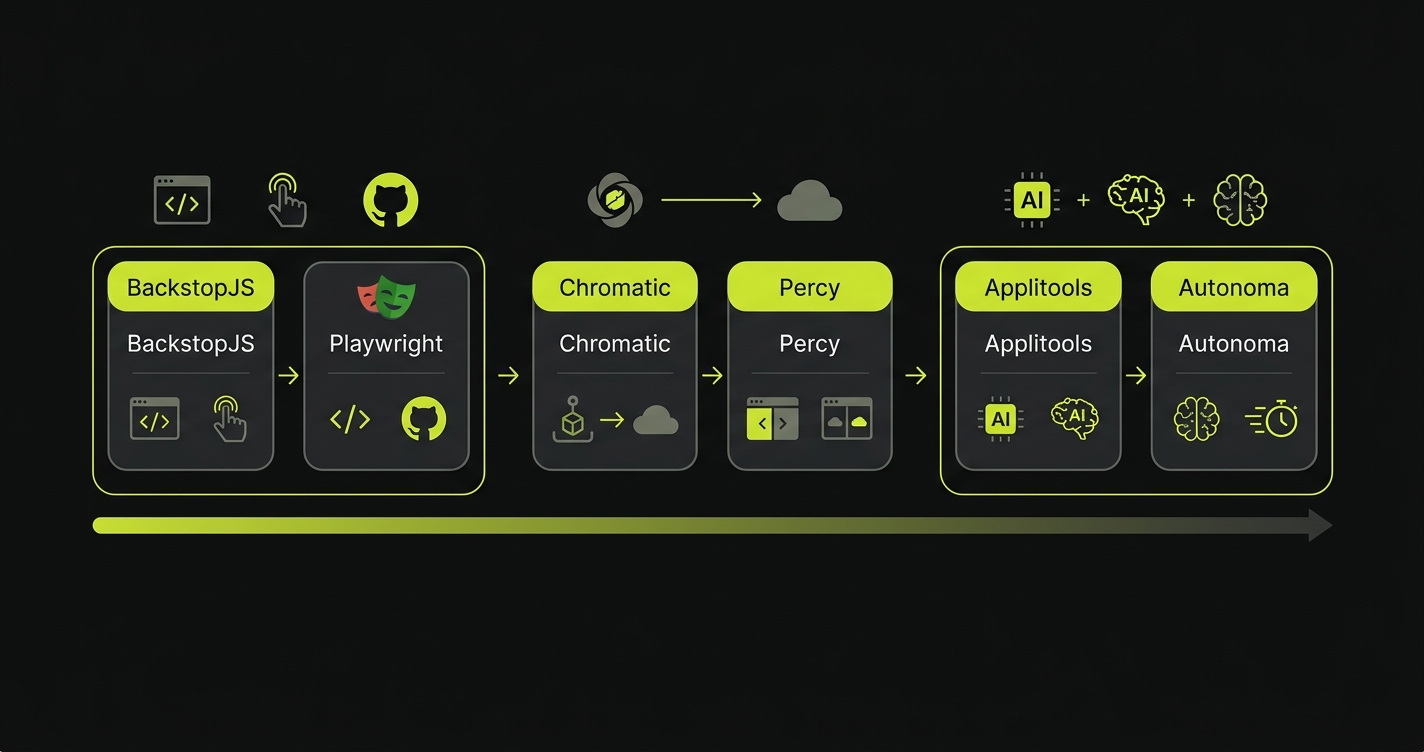
Visual regression testing is the practice of capturing screenshots of your UI at a known-good state, then comparing future screenshots pixel-by-pixel (or semantically) to detect unintended visual changes. It catches bugs that functional tests miss entirely: broken layouts, wrong font sizes, misaligned buttons, incorrect color tokens. The top tools in 2026 are BackstopJS (free, open-source), Playwright visual comparisons (built-in, free), Chromatic (Storybook-focused, component-level), Percy (BrowserStack ecosystem), Applitools Eyes (AI-powered, enterprise), and Autonoma (AI-powered with semantic noise filtering). This guide compares all six head-to-head and includes working BackstopJS and Playwright setup code.
In the last two years, AI code generation has become a standard part of frontend development. Cursor, Copilot, and their peers now write a meaningful share of the UI code that ships to production. That shift has quietly changed the bug distribution of a typical frontend codebase.
The class of bug that increases is specific: layouts that are structurally correct but visually wrong. The component renders without errors. Functional tests pass. The button triggers the right handler. But the spacing is off by a few pixels, the font weight doesn't match the design system, the mobile breakpoint is slightly broken. These bugs don't show up in coverage reports. They show up when a user takes a screenshot and files a support ticket.
Visual regression testing tools catch this class of bug by doing something no functional test does: looking at the rendered output. We evaluated six tools, from free open-source options to enterprise AI-powered platforms, and ran each against the same set of AI-generated UI changes. What we found changes how we think about where these tools fit in a modern frontend pipeline.
Why AI Code Generators Create a New Class of Visual Bug
A human developer building a component looks at what they're building. They see the button is misaligned. They notice the spacing doesn't match the surrounding elements. The visual feedback loop is built into the development process.
AI code generators don't have that loop. They reason about code tokens: class names, style properties, component props. When an LLM generates padding: 12px 16px, it's producing a syntactically valid CSS rule, not placing pixels on a screen. The model has no idea that your design system uses an 8px spacing scale and 12px padding puts this component visually out of step with everything around it.
This produces a specific, predictable failure pattern. The generated code is structurally correct. Imports resolve. Components render without errors. Functional tests pass because the button exists, is clickable, and triggers the right handler. But the visual output is off in ways that only become obvious once a human looks at a browser.
We covered how this intersects with broader regression risk in our automated regression testing guide. The visual layer is where that risk is most invisible to traditional tooling.
The specific visual bugs AI generators introduce fall into a few consistent categories. Wrong spacing values that are numerically valid but don't match the design system. Color tokens from a previous design system version that still compile but are visually deprecated. Responsive breakpoints that were generated by pattern-matching similar components rather than reading the actual design spec. Misaligned flex or grid children where the container props are correct but the child alignment doesn't account for the parent's existing styles.
None of these fail a linter. None of them throw a runtime error. All of them are visible the moment a user opens the page.
How Visual Regression Testing Actually Works (Screenshot Testing Explained)
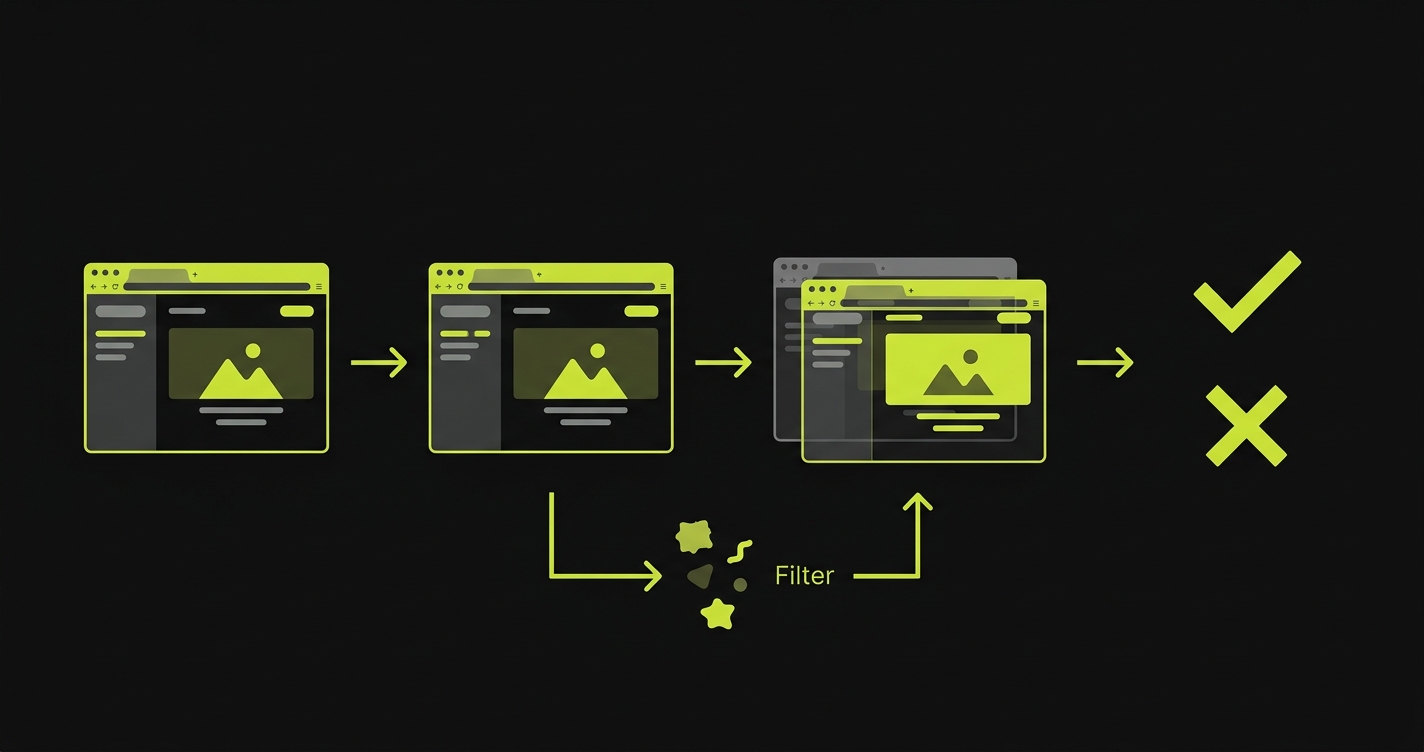
The mechanism is straightforward: capture a screenshot of your UI in a known-good state, store it as a baseline, then compare every subsequent render against that baseline. Any pixel difference above a configurable threshold triggers a diff report. This approach is sometimes called screenshot testing or UI regression testing, and both terms describe the same capture-and-compare mechanism.
The hard part isn't the capture. It's the noise. Animations, dynamic content, anti-aliasing differences across rendering engines, font rendering variations between operating systems. All of these produce pixel differences that aren't regressions. A naive pixel diff will flag your loading spinner as a broken component every single run. Managing this noise is what separates useful visual testing from a false-positive machine that your team learns to ignore.
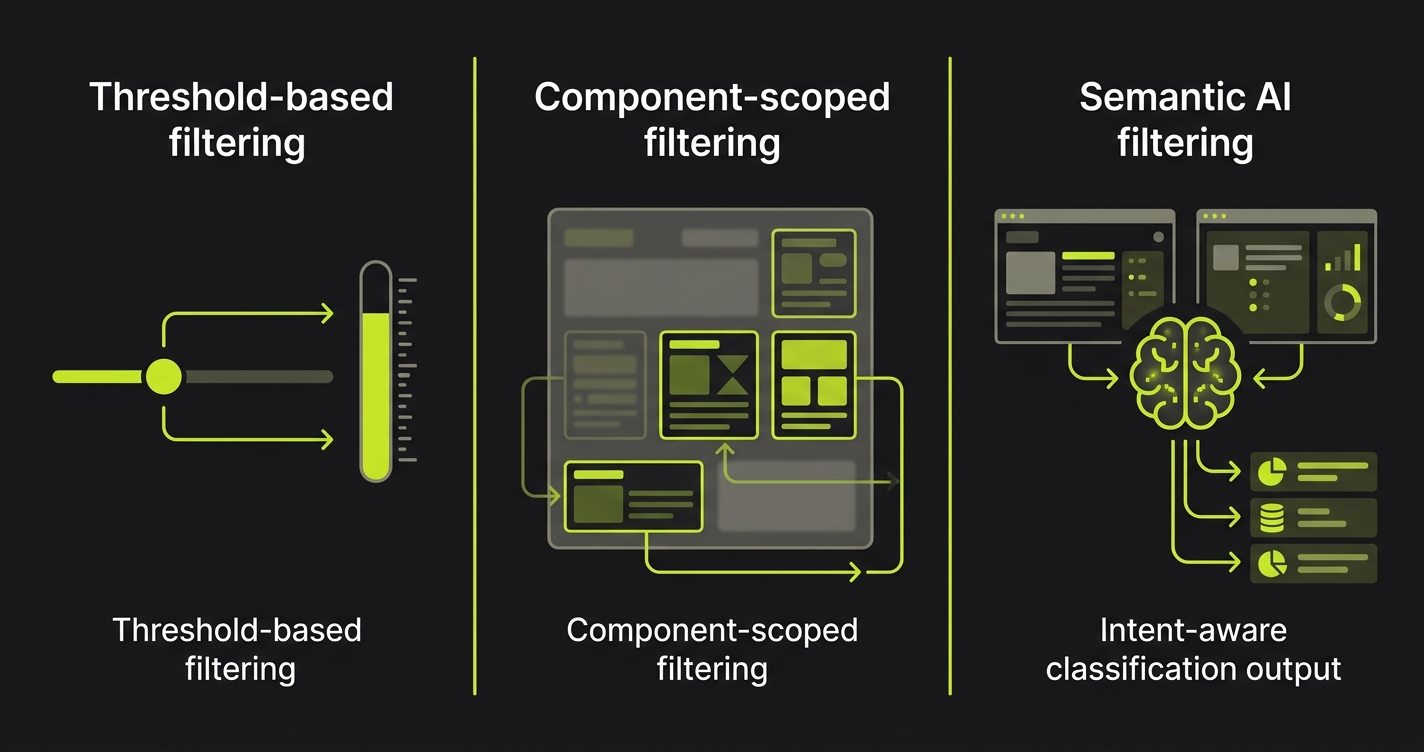
The visual testing tools in this comparison take fundamentally different approaches to the noise problem. Some use threshold-based filtering (ignore differences below X%). Some use AI to classify whether a difference represents an intentional change or an unintentional regression. Some scope to component level rather than full-page screenshots, reducing the surface area for noise. Understanding which approach fits your team is the core decision.
Visual Regression Testing Tools: Head-to-Head Comparison
| Tool | AI Capabilities | Baseline Management | CI/CD Integration | Scope | Noise Filtering | Pricing |
|---|---|---|---|---|---|---|
| BackstopJS | None | Manual (git-tracked screenshots) | Good (CLI-based) | Page-level | Threshold only | Free (open-source) |
| Playwright Visual | None | Auto-generated snapshots | Native (built into Playwright) | Page + element | Threshold only | Free (built-in) |
| Chromatic | Limited (change detection) | Storybook-based, automatic | Good (GitHub Actions) | Component-level | UI review workflow | Free tier, then $149+/mo |
| Percy | Limited | Automatic, branch-aware | Good (BrowserStack native) | Page + component | Threshold + review | $599+/mo (BrowserStack) |
| Applitools Eyes | Strong (Visual AI) | Automatic, multi-browser | Excellent | Page + component + region | AI-powered (Layout, Content, Strict modes) | Enterprise ($2,000+/mo) |
| Autonoma | Strong (semantic understanding) | Automatic, intent-aware | Excellent | Full-flow + page | Semantic (real vs. intentional change) | Free tier; Cloud from $499/mo |
BackstopJS: The Free Option That Requires Real Work
BackstopJS is the go-to open-source choice. It's battle-tested, straightforward, and genuinely capable. If you want visual regression coverage without a budget, this is where you start.
The tradeoff is setup time and maintenance overhead. BackstopJS doesn't manage your baselines intelligently. When you intentionally update a component's design, you'll update the baseline manually. When a test fails in CI, someone has to review the diff image, decide if it's a real regression or an expected change, and approve or reject. The workflow is manual. For a small team running a handful of scenarios, that's fine. At scale, it becomes a second job.
BackstopJS Quickstart
Install and initialize:
npm install -g backstopjs
backstop init
This generates a backstop.json config in your project root. Here's a working config for a typical web app with three pages:
{
  "id": "my_app_visual",
  "viewports": [
    { "label": "desktop", "width": 1280, "height": 800 },
    { "label": "tablet", "width": 768, "height": 1024 },
    { "label": "mobile", "width": 375, "height": 812 }
  ],
  "onBeforeScript": "puppet/onBefore.js",
  "onReadyScript": "puppet/onReady.js",
  "scenarios": [
    {
      "label": "Homepage",
      "url": "http://localhost:3000",
      "delay": 500,
      "misMatchThreshold": 0.1,
      "requireSameDimensions": true
    },
    {
      "label": "Checkout - Empty Cart",
      "url": "http://localhost:3000/checkout",
      "delay": 500,
      "misMatchThreshold": 0.1
    },
    {
      "label": "Product Page",
      "url": "http://localhost:3000/products/sample-item",
      "delay": 800,
      "hideSelectors": [".dynamic-timestamp", ".ad-banner"],
      "misMatchThreshold": 0.2
    }
  ],
  "paths": {
    "bitmaps_reference": "backstop_data/bitmaps_reference",
    "bitmaps_test": "backstop_data/bitmaps_test",
    "engine_scripts": "backstop_data/engine_scripts",
    "html_report": "backstop_data/html_report",
    "ci_report": "backstop_data/ci_report"
  },
  "report": ["browser", "CI"],
  "engine": "puppeteer",
  "engineOptions": {
    "args": ["--no-sandbox"]
  },
  "asyncCaptureLimit": 5,
  "asyncCompareLimit": 50,
  "debug": false,
  "debugWindow": false
}
Key config decisions worth understanding: misMatchThreshold controls how much pixel difference is tolerated before the test fails (0.1 = 0.1%, a tight but workable threshold for stable pages). hideSelectors lets you mask dynamic content like timestamps or ads that would otherwise produce noise on every run. delay gives animations time to settle before capture.
Capture your initial baselines:
# Start your local dev server first
npm run dev

# In another terminal, capture baselines
backstop reference

# Run tests (compare against reference)
backstop test

# If a diff is intentional, approve the new baseline
backstop approve
After backstop test, you'll get an HTML report showing side-by-side baseline vs. test screenshots with highlighted diff regions. A failing test looks like two screenshots of your homepage with a bright red overlay exactly where the button shifted 4px to the left. It's immediately obvious what changed and where.
For CI, add to your pipeline:
# GitHub Actions example
- name: Run visual regression tests
  run: |
    npx backstop test --config=backstop.json
  continue-on-error: false
The limitation you'll feel first: when your CI environment renders fonts or anti-aliases slightly differently than your local machine, tests fail on every run. The standard fix is running BackstopJS inside Docker to ensure consistent rendering across environments.
Playwright Visual Comparisons: Zero Setup If You're Already Using Playwright
If your team runs Playwright for E2E testing, visual comparisons are already available. No new tool, no new dependency. It's a single additional assertion.
import { test, expect } from '@playwright/test';

test('checkout page visual regression', async ({ page }) => {
  await page.goto('/checkout');

  // Wait for any loading states to resolve
  await page.waitForLoadState('networkidle');

  // Full page screenshot comparison
  await expect(page).toHaveScreenshot('checkout-page.png', {
    maxDiffPixelRatio: 0.01, // 1% difference tolerance
    fullPage: true
  });
});

test('checkout button states', async ({ page }) => {
  await page.goto('/checkout');

  // Scope to a specific element - much less noise
  const checkoutButton = page.locator('[data-testid="checkout-btn"]');

  await expect(checkoutButton).toHaveScreenshot('checkout-btn-default.png');

  // Test hover state
  await checkoutButton.hover();
  await expect(checkoutButton).toHaveScreenshot('checkout-btn-hover.png');
});

test('responsive layout - mobile', async ({ page }) => {
  await page.setViewportSize({ width: 375, height: 812 });
  await page.goto('/checkout');
  await page.waitForLoadState('networkidle');

  await expect(page).toHaveScreenshot('checkout-mobile.png', {
    maxDiffPixelRatio: 0.02
  });
});
The first time you run this, Playwright generates the baseline screenshots automatically and stores them in a screenshots directory. Subsequent runs compare against these. To update baselines after an intentional change: npx playwright test --update-snapshots.
Element-scoped assertions are worth using over full-page captures wherever possible. A full-page screenshot of your checkout flow will catch a lot of noise from dynamic content and minor rendering variations. Scoping to data-testid="checkout-btn" means the test only fails if the button itself changed, not if something else on the page shifted.
The ceiling on Playwright visual comparisons is the noise filtering. You get pixel thresholds. That's it. When your team makes a large intentional redesign, updating snapshots is a manual pass through every test file. When a font loads slightly differently in your CI Docker container, you'll spend time investigating false positives. The built-in tooling is genuinely useful for teams already in the Playwright ecosystem. It's not the right answer for teams running hundreds of visual scenarios.
Chromatic: The Right Answer If You're Using Storybook
Chromatic was built specifically for component-level visual testing in Storybook. If your component library has Storybook stories, Chromatic captures visual snapshots of every story on every PR and surfaces diffs in a review UI.
The advantage of the component-level approach is noise reduction by design. You're not screenshotting a full page with dynamic content. You're screenshotting a stateless component in an isolated environment. The diff surface is smaller. The false positive rate drops significantly.
The workflow is genuinely pleasant. After connecting your Storybook project to Chromatic, every PR generates visual diffs for changed components. A team member reviews the diffs through Chromatic's UI, approves intentional changes, and flags regressions. The approved changes become the new baseline. It's closer to a design review workflow than a testing workflow.
The limitation is scope. Chromatic tests components in isolation. It won't catch the bug where your correctly-rendered button component is placed incorrectly inside a parent container on an actual page. For full-page regression coverage, you need Chromatic plus something else. For component-library teams, it's excellent. For product teams testing user-facing flows, it's partial coverage.
Pricing is reasonable on the free tier (5,000 snapshots/month) and climbs from there. For teams with large Storybook libraries, snapshot counts accumulate faster than expected.
Percy: Solid If You're Already in the BrowserStack Ecosystem
Percy integrates tightly with BrowserStack's device and browser matrix. If you're already paying for BrowserStack for cross-browser functional testing, Percy gives you visual regression coverage across the same device matrix. That's the specific case where Percy makes sense.
The baseline management is automatic and branch-aware: Percy understands your Git branch structure and compares PRs against the correct baseline branch. The review workflow is clean.
The downsides are speed and cost. Percy's baseline processing is slower than some competitors. Diffs aren't always available immediately after a test run, which creates awkward CI pipeline timing. And if you're not already a BrowserStack customer, the pricing for Percy alone doesn't compare favorably against Chromatic or Applitools for similar coverage.
Applitools Eyes: The Enterprise Option
Applitools Eyes is the most capable visual testing platform in this comparison. The Visual AI is genuinely better at noise filtering than any threshold-based approach. It understands layout-level changes versus content-level changes, supports multiple comparison modes (Strict, Layout, Content, Dynamic), and handles rendering differences across browsers and devices without producing false positives.
The problem is cost and complexity. Applitools is priced for enterprise QA organizations, not product teams running lean. Setup is non-trivial. The SDK documentation is deep, which means powerful but steep. Teams who've gone through the full setup report excellent results. The journey to those results requires real investment.
For a team of 8-15 engineers doing a few hundred visual tests, the ROI doesn't pencil out. For a 50-person QA organization running thousands of tests across a multi-product suite, it absolutely does.
The comparison with BackstopJS is stark. BackstopJS is free and gives you threshold-based pixel diffs. Applitools is expensive and gives you AI-powered semantic classification. The gap between them is real. Which side of that gap you belong on depends almost entirely on scale.
Where Visual Testing Tools Fall Short: The Baseline Problem
All of these tools share a common limitation: they're reactive. They capture a state, compare it against a previous state, and tell you something changed. What they don't do is tell you whether that change represents an actual user-facing regression or an intended design update.
This creates the baseline management problem every team eventually hits. Visual changes accumulate. Intentional redesigns require bulk baseline updates. Slightly intentional, slightly unintentional changes (the designer updated the button radius but the AI generator also moved the padding) require human judgment on every diff. The review burden scales with the number of visual tests.
This is the gap that connects visual regression testing back to the broader AI coding workflow problem. As we've explored in our guide to AI testing tools, AI-generated code needs AI-aware testing, tooling that understands intent, not just pixels.
Autonoma approaches this differently. Instead of pixel comparison against a frozen baseline, our Planner agent reads your codebase to understand what each component is supposed to do and plans test cases around that intent. When a visual change shows up in a test run, our Reviewer agent classifies the result: a real bug, an agent error, or a test-plan mismatch, rather than just flagging a pixel delta. That semantic layer is what reduces the false positive rate on AI-generated code specifically, because the classification is grounded in what the code was supposed to do, not just what changed on screen.
For teams deep in AI-assisted development, this approach sidesteps the baseline management problem rather than adding workflow around it. Explore our plans to see how it fits your stack.
Which Visual Regression Testing Tool Fits Your Team?
The decision is mostly about scale and existing toolchain.
If you're not doing visual testing at all and want to start: Playwright's built-in comparisons. Zero new dependencies, works today, teaches you what visual regression actually catches in practice.
If you want dedicated open-source tooling with a real workflow: BackstopJS. Budget three to five days for setup and Docker configuration. The manual baseline management is manageable at under 50 scenarios.
If you use Storybook heavily and want component-level coverage: Chromatic. Connect your Storybook, start reviewing diffs in the Chromatic UI. The workflow is the best in this comparison at the component scope.
If you're a BrowserStack customer running cross-browser testing: Percy extends naturally. The device matrix coverage is the differentiator.
If your QA org runs hundreds of visual tests across a multi-product suite and budget isn't the binding constraint: Applitools Eyes. The AI is legitimately better at noise filtering at scale.
If your team ships primarily AI-generated code and wants visual testing that understands intent rather than just pixels: Autonoma takes a semantic approach that matters more than any of the above. The false positive problem on AI-generated code is real, and threshold-based tools solve it the wrong way (by raising thresholds until they stop firing, which means they stop catching things too). See pricing to get started.
Connecting Visual Testing to Your Broader QA Strategy
Visual regression testing doesn't replace functional testing. A test that verifies the checkout button triggers payment processing will never tell you the button is the wrong shade of blue. A visual regression test will never tell you payment processing actually works. Both are true simultaneously, which is why both layers exist.
The specific urgency around visual regression in 2026 is the AI coding layer. As your team ships more AI-generated UI code faster, the gap between "code review passed" and "page looks correct" grows. Code review can't see what a browser renders. Your linter can't see it either. Visual regression testing is the only automated layer that does.
For teams who want to understand how visual regression fits into the full testing picture, our post on automated code review vs. testing covers the distinction in detail. The short version: code review and linting are language-level tools. Visual regression is a rendered-output tool. They're not substitutes. They catch different bugs.
The practical recommendation: add Playwright visual snapshots to your existing E2E suite this week. Pick two or three critical pages: checkout, signup, the hero section of your marketing site. Capture baselines. Run them in CI. You'll catch something within a month. Then decide whether you need a dedicated tool based on what you're finding and how much time you're spending on false positives. For teams who find threshold-based tools generating too much noise on AI-generated code, Autonoma combines functional E2E testing with semantic visual awareness, bridging both layers in a single tool rather than stitching together separate visual and functional suites.
Visual testing has a low floor for entry and a high ceiling for capability. The right tool is the one you'll actually run. Start free with Autonoma if you want both functional and visual coverage in one platform.
Visual regression testing compares screenshots of your UI against stored baselines to detect unintended visual changes. It matters specifically for AI-generated code because AI tools like Cursor and Copilot produce code that passes linting and functional tests while introducing visual bugs (wrong spacing, incorrect color tokens, broken responsive layouts) that only appear in a rendered browser. Code review can't catch these because reviewers are reading code, not rendering pixels.
BackstopJS and Playwright's built-in visual comparisons are both free. If you're already using Playwright for E2E testing, start there. Zero new dependencies, works immediately. If you want a dedicated visual testing tool with a full workflow (HTML reports, scenario management, Docker support), BackstopJS is the stronger choice. Budget several days for initial setup and Docker configuration to ensure consistent rendering across environments.
The standard approaches: use element-scoped comparisons instead of full-page screenshots (smaller diff surface), run tests in a consistent Docker environment (eliminates font rendering and anti-aliasing differences between machines), use hideSelectors to mask dynamic content like timestamps and ads, and set misMatchThreshold conservatively (0.1–0.2% works well for stable pages). For teams generating lots of AI code, consider tools with semantic noise filtering rather than purely threshold-based approaches.
For large QA organizations running hundreds of visual tests across multiple products, yes. The Visual AI is genuinely better at noise filtering than threshold-based tools, and the multi-browser baseline management is excellent. For teams of under 20 engineers or under 100 visual test scenarios, the cost is hard to justify against BackstopJS plus Playwright.
They cover different scopes. Chromatic tests isolated components in Storybook, which is excellent for component libraries and design systems. Playwright visual comparisons test pages in a browser with real navigation, state, and layout. You can run both: Chromatic for component-level coverage, Playwright for page-level regression testing. Many teams do.
Most visual regression tools compare pixels. They tell you something changed, and a human decides if that change is intentional. Autonoma's agents read your codebase to understand what each component is supposed to do, then assess whether a visual change matches updated code intent (intentional) or diverges from it (regression). This semantic understanding is particularly useful for AI-generated code, where visual changes are frequent and a pixel-diff tool would generate noise on every sprint.


